As voice technology continues to advance, wake word detection has become a key part of how we interact with devices. Instead of continuously processing all speech, a wake word allows an app or device to "wake up" only when you say a specific phrase, like "Hey AppName". This approach makes interactions feel natural and responsive while conserving device resources and enhancing user privacy.
The term wake word detection is often used interchangeably with hotword detection, keyword spotting, or voice triggers.
One of the biggest advances in technology today is on-device processing. Running wake word detection offline makes responses faster, keeps your audio private, and eliminates reliance on an internet connection. This is especially important for mobile devices, where connectivity can be spotty.
For developers, offline wake word detection unlocks exciting possibilities. Users can activate apps, smart devices, or workflows just by speaking a phrase—anywhere, anytime. It ensures voice interactions are reliable, consistent, and secure, no matter where you are.
This guide shows how to add custom, on-device wake word detection to a React Native app with Porcupine Wake Word.
If you prefer video walkthroughs, you can also follow along with the equivalent YouTube tutorial: How to Detect Custom Wake Words in React Native Apps [Android & iOS].
What you'll learn:
- Setting up audio recording permissions for iOS and Android
- Adding custom
wake word detectionwith Porcupine
What you need:
- React Native 0.73+
- Android 5.0+ (API 21+)
- iOS 16.0+
Configure Microphone Permissions
Before we begin—integrating wake word detection requires recording audio, which means the user must grant permission. Set up your project to request and handle these permissions:
iOS Permissions
Add the following block to Info.plist:
Android Permissions
Add the following block to AndroidManifest.xml:
Internet is required only for licensing and usage tracking.
Add Wake Word Detection with Porcupine
- Install Porcupine React Native Dependencies: To use Porcupine Wake Word in your React Native project, install @picovoice/react-native-voice-processor and @picovoice/porcupine-react-native:
Get Your Picovoice Access Key: Sign up for a free Picovoice Console account and obtain your
AccessKey. TheAccessKeyis only required for authentication and authorization.Train Custom Keywords: Create a custom wake word using the Picovoice Console. Be sure to read our guide on choosing a wake word to ensure optimal performance.
If you'd like to see a video walkthrough for creating a wake word, check out Picovoice Console Tutorial: Porcupine Wake Word.
Add Keyword Files to Your Project: Once you have chosen your
keyword, you will need to download twokeywordfiles—one for Android, and one for iOS. The files will have a.ppnextension. In the Android subproject, add the Android keyword file to theassetsfolder (${ANDROID_APP}/src/main/assets). In the iOS subproject, add the iOS keyword file to theCopy Bundle Resourcesstep. In the following code examples, this file will be referred to as${KEYWORD_FILE_PATH}.Using Non-English Model Files (Optional): The English model file is built into
Porcupine, so if you trained an English keyword, you can skip this step. Otherwise, you will need the corresponding Porcupine model file. Similar to step 4, add this file to theassetsfolder for Android, andCopy Bundle Resourcesstep for iOS. In the following code examples, this file will be referred to as${MODEL_FILE_PATH}.
Step-by-Step Code Implementation
First, we'll break down the key components of the Porcupine React Native SDK. At the end is a fully implemented component that you can simply drop into your project for a quick proof of concept.
- Define a function to handle
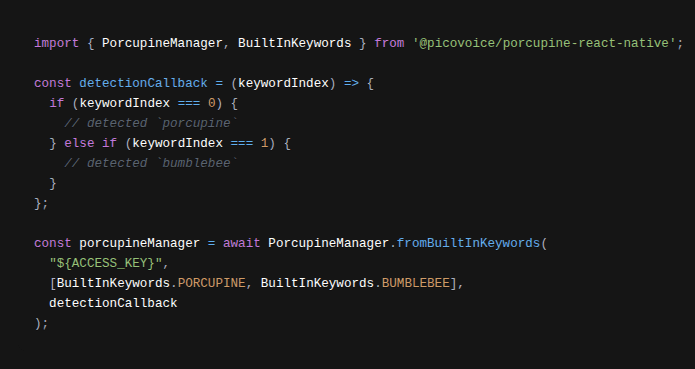
keyword detection. You can pass in more than onekeyword, and the detection callback function will give you the index of thekeyworddetected. Also define an error handler callback.
- Create an instance of
PorcupineManager. Be sure to replace the placeholders, and pass in yourdetectionCallback()andprocessErrorCallback()functions.
- To start listening for
wake words, callstart().
- To stop listening for
wake words, callstop().
- Once you no longer need
PorcupineManager, be sure to release the resources acquired by callingdelete().
Complete Code Implementation
Below is a fully implemented component you can copy into your project to see Porcupine in action. Be sure to replace the placeholders ${ACCESS_KEY}, ${KEYWORD_FILE_PATH}, and ${MODEL_FILE_PATH} (if applicable).
To see a complete working project, check out Porcupine's React Native demo on GitHub. For more in-depth information, refer to the Porcupine React Native SDK quick start guide.
Next Steps: Adding Voice Commands
You've built wake word detection—now make it truly useful by adding voice commands. Once users say the wake word, they can immediately give instructions, creating a natural, seamless way to interact with your app. By combining the two, you'll deliver a truly hands-free experience that feels effortless and intelligent from the first word to the last.
Frequently Asked Questions
Due to the nuances of wake word benchmarking, Picovoice also published detailed guides explaining how to benchmark a wake word engine and how to verify wake word vendors' claims. These resources enable developers who are not familiar with the voice AI to independently evaluate Porcupine's performance and compare it against any other solution using standardized metrics.


