Speaker Recognition, or Speaker Identification, analyzes distinctive voice characteristics to identify and verify speakers, enabling voice authentication and personalized services. However, many Speaker Recognition applications rely on cloud-based services, leading to frequent latency issues that hinder user experience. Fortunately, Picovoice's Eagle Speaker Recognition offers on-device Speaker Recognition, maintaining accuracy while bypassing the limitations inherent in cloud-based services.
Speaker Recognition typically involves two steps: Enrollment, where a speaker's voice is registered using a short clip of audio to produce a Speaker Profile, and Recognition, where the Speaker Profile is used to detect when that speaker is speaking given an audio stream.
Let's see how the Eagle Speaker Recognition Node.js SDK can be used to implement a speaker recognition app!
Setup
Install @picovoice/eagle-node using npm. We will also be using @picovoice/pvrecorder-node to get cross-platform audio, so install that as well:
@picovoice/eagle-nodewill perform the speaker enrollment and recognition@picovoice/pvrecorder-nodewill be used to record microphone audio
You will also need a Picovoice AccessKey, which can be obtained with a free Picovoice Console account.
Enroll a speaker
Import @picovoice/eagle-node and create an instance of the EagleProfiler class:
Now, import @picovoice/pvrecorder-node and create an instance of the recorder as well. Use the EagleProfiler's .minEnrollSamples as the frameLength, and call .start():
To stop recording audio, call enrollRecorder.stop()
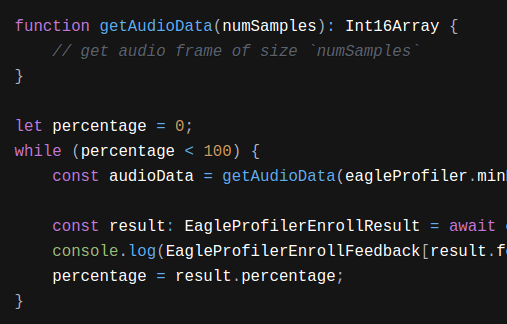
Each call to .read() will return a single audioFrame that you can then pass to .enroll() to enroll a speaker. The return value provides feedback on the audio quality and Enrollment percentage. Use the percentage value to know when Enrollment is done and another speaker can be enrolled.
Once Enrollment reaches 100%, export the speaker profile to use in the next step, Speaker Recognition:
The returned speakerProfile is an instance of a Uint8Array, so it can also be saved and reused if needed.
Profiles can be made for additional users by calling the .reset() function on the EagleProfiler, and repeating the .enroll() step.
Once profiles have been created for all speakers, don't forget to clean up used resources:
Perform recognition
Import @picovoice/eagle-node and create an instance of the Eagle class, using the speaker profile(s) created by the Enrollment step:
Now set up PvRecorder to use with Eagle:
Pass audio frames into the eagle.process() function to get the speaker scores:
When finished, don't forget to clean up used resources:
Putting It All Together
Here is an example program bringing together everything that has been shown so far:
Next Steps
See the GitHub Node.js Demo for a more complete example. You can also view the Node.js API docs for details on the package.
If Node.js is not your language of choice, Eagle Speaker Recognition has SDKs in a number of different languages and platforms:
# Speaker Enrollmento = pveagle.create_profiler(access_key)while percentage < 100:percentage, feedback = o.enroll(get_next_enroll_audio_data())speaker_profile = o.export()# Speaker Recognitioneagle = pveagle.create_recognizer(access_key,speaker_profile)while True:scores = eagle.process(get_next_audio_frame())
Have you seen our other Node.js tutorials? Don’t forget to check out Real-time Transcription with Node.js, Batch Transcription with Node.js, and Voice Activity Detection with Node.js.


